|
|
|
|
|
How
I
built a CoolBot Refrigerator Trailer
Overview
I'd first read about CoolBot many years ago and when doing
my farm planning documents I always included a
CoolBot designed refrigeration unit in my costing plans.
Then a couple of years ago I saw an article in "Growing
for Market" where someone had used a CoolBot to build a
refrigerated trailer unit. The thought of joining the
costs of a market trailer and refrigeration unit were too
good to be true and I decided instantly that this was the
way to do it. We're in our first year of farming on our
land now and this spring I got my chance to build my
CoolBot Refrigerator Trailer.
I am by no means a skilled DIYer. I like to have a go at
most jobs around the farm but generally they end up
looking like a non professional did them. I found the nuts
and bolts of converting the trailer was not above me. It
took much more time than I expected, due 90% to insulating
the trailer, and don't forget to leave time at the end for
materials to cure before you put food into it.
Following is a cost break down and a photo journal of how
I built my trailer. After a few wrong turns and a little
more work than I expected I ended up with a refrigerated
trailer that I think works really well and EASILY can be
kept to 40 F or below. At home I just use an extension
cord to power the A/C unit. At markets I use a generator.
My produce is kept cold wherever it goes!
|


 |
|
|
Cost breakdown
| 6' X 10' Stealth
Trailer with V Front |
$2,380 |
| CoolBot |
$299 |
| LG Window Air
Conditioning Unit (12,000 btu) |
$315 |
| Foam Insulation - 2" x
4' x 8' sheets (20) |
$400 |
| Reflective bubble wrap
insulation |
$100 |
| Other materials (gap
fillers, screws, power cord, sealants, plywood...) |
$350 |
| Total |
$3,844 |
|

|
|
|
Tools
I ended up using the following tools:
Placing
A/C
unit:
Sawzall
Grinder
Hacksaw
Power Drill and Impact Driver
Insulating:
Hand Saw to cut foam and plywood
Circular Saw for some plywood cuts
Level
Tape measure, marker pens
Caulk Gun
Power Drill and Impact Driver |
 |
|
|
Photo Journal
First of all I wanted to install the A/C unit and
CoolBot and get it all running. After the initial
apprehension of putting a great big hole in your brand
new trailer this is actually by far the easiest and
most rewarding part of the whole build process.
I decided to make the trailer as level as possible.
Mostly I ended up taking measurements relatively but
when it came to trying to find the studs at the
insulation stage I sometimes needed to use a level to
try and hit the stud and this payed off.
|
 |
|
|
Step 1: Create a hole for the A/C unit
Remove the front panels of plywood and store in a safe
place. (I reused all the original plywood in the final
layer)
I measured the A/C unit to be 15" high and 21" wide
without the top piece where the window would
normally butt up against. I made the top of my hole 6"
from the top of the trailer estimating 4" for the
insulating + a little for the plywood. In hindsight
when insulating this got a little too close. I'd leave
an 8-10" gap from the top of the trailer next time. I
measured the hole as best I could and then drilled
holes in the walls big enough for the sawzall. I then
cut one side of the wall out, then the other, and then
the center strut.
To test the fit, the A/C unit can be taken out of its
outside casing. It's easier to use just this outside
casing to test the size of your hole and make further
adjustments where needed. |


  |
|
|
Step 2: Frame in the supports for the A/C unit
I had some 2" square metal piping laying around and I
decided to use that to support the A/C unit. Originally I
was worried about how to support the unit as they're
around 80 lbs in weight but this didn't prove to be a
problem. By the time I'd added the supports and then
insulated around it the unit was very solidly in place.
You could easily just use 2x4s to support the A/C unit if
you wished and save yourself some time.
I didn't end up framing the whole unit as I originally
planned. I ended up just making a ledge basically for the
unit to sit on. The outside cover was then screwed onto
the ledge and the unit slides into that and is screwed to
the casing. It seemed very secure.
Your A/C unit will have specific instructions for how it
is supposed to sit and these should be adhered to as
closely as possible. Because of the v-front I ended up
covering over the top vents so it would not be drawing in
the cool air from the trailer and this hasn't appeared to
have affected the unit's performance.
As my trailer has a v-front I put a support post
vertically down the center for the two horizontal beams to
sit on. The horizontal beams were attached to the trailer
and vertical post with metal brackets.
Next, a third horizontal beam goes across where the front
of the unit is going to sit. Each end needs to be cut at
the propper angle and again I used metal brackets to
secure it to the previous two horizontal beams. I did not
think I required a vertical support of this beam and liked
that I had a clear usable space under the unit. Perhaps if
you're using 2x4s you may be happier with an additional
vertical support.
Finally the cover for the A/C unit is placed and screwed
down onto the frame. The A/C unit is placed inside it's
cover and screwed in. You can decide whether or not you
want to seal around the unit now or wait until the
insulation stage. |


|
|
|
Step 3: Adding a power cord and testing the A/C and
CoolBot works
To supply power to the inside of the trailer I ended up
just buying a 2' tri-source plug. This left me with three
sockets on the inside and a male connector on the outside
I could connect my extensioin cord to.
To fix it to the trailer I cut a hole big enough for the
male connector to fit through and placed the three socket
end on top of the horizontal beam I made to support the
A/C unit. In hindsight I should have left more cord so the
sockets were further from the wall. I had to cut into my
last layer of insulation to allow for the plugs from the
A/C unit and the CoolBot. There's no real reason I can
think of not to leave plenty of cord to play with.
I refilled the hole around the plug with a spare piece of
the metal from the trailer and some sealant.
Now to test it's all going to work! I temporarly screwed
the coolbot to a place under the A/C unit. Then following
the instructions with the CoolBot was able to hook it up
in less than 5 minutes I would guess. It really is very
easy and logical and the A/C unit I chose didn't have any
of the possible problems (i.e. no extra or metal sensor).
Plug the CoolBot and A/C unit into your tri-source plug
then plug the outside male connector to your extension
cord. Adjust the A/C unit to it's lowest temperature
(probably around 60 F) and highest fan speed. Adjust the
CoolBot to around 40 F if it's not already set there. I
was amazed at the frigidity and amount of cool air coming
out of the unit. Even with the doors slightly open the air
temperature dropped to in the 40s within 5 minutes.
Ok, this really is going to work!
|


|
|
|
Step 4: Insulating
This is no doubt the most important stage and it
definitely takes some time. I spent a lot of time
insulating around the A/C unit and the front "V" of the
trailer. In hindsight I'd consider a flat front trailer
next time in hopes of saving time on the build. Other
difficult areas are the tail lights and around the rear
doors. In the end though it's a case of jamming enough
stuff in there, using the gap filler and calling it good
enough. How ever tight you get it there's always going to
be weak spots around the rear doors and the A/C unit
itself is not built air tight.
First of all I padlocked the side door closed. I'm going
to insulate over it so it won't be being used again.
Secondly I took off all the existing plywood. I saved this
and used it at the end to help recover the inside of the
trailer. My original intention was to put the insulating
foam right against the outside wall and cut around the
metal joists giving me an extra 1 1/2" usable room each
side. I started by insulating around the tail lights and
above the door. By the time I'd finished that I looked at
the rest of the trailer and couldn't imagine how long it
would take to do something similar to the whole trailer so
I went to plan B.
Plan B was to attach reflective bubble wrap around the
inside of the trailer first and then attach the rigid foam
insulation over that. Per square foot the reflective
bubble wrap was cheap and depending on how it's installed
could add quite nicely to the R-Value (I couldn't work out
exactly what R-Value I was getting with how I installed
it). Then I'd add the rigid foam. I could only find 2"
foam with an R-10 value. So 4 inches would add another
R-20. Hopefully I'd be getting somewhere near R-30 but
atleast R-25 I'd guess in most places.
To attach the reflective bubble wrap I found that
professional grade duct tape worked well. Eventually it
would be sealed behind 4" of foam board so this should
keep it in place fine. Try to leave a gap where ever
possible between the bubblewrap and the side of the
trailer. The bubblewrap is designed to work with an air
gap and that's how it gets its higher R-Values. I
overlapped it slightly and taped along the edges to try
and get a nice seal. I used two 25' x 4' rolls and two 25'
x 2' rolls. The 6' of width between the 2 rolls covered
the areas nicely without having to do any long cuts of the
bubble wrap. Eventually I covered the entire trailer
except the rear doors. (I'm not sure now why I left the
rear doors uncovered, perhaps I forgot when it came around
to insulating the doors).
Make sure you keep track of where the studs are with a
marker so you can find them again when attaching the rigid
foam and plywood.
Once I bubble wrapped the ceiling and walls I put the
first layer of rigid foam insulation on the ceiling. I
used 3" self tapping screws to hold up the foam for the
first layer. I needed to drill a pilot hole into the metal
stud first for the screw to be driven into.
To reduce the amount of gaps I insulated the areas in this
order.
- Layer 1: ceiling, floor, walls
- Layer 2: ceiling, floor, walls
- Rear doors both layers
Once the ceiling had it's first layer of foam I bubble
wrapped and put rigid foam on the floor. I kept this in
place also with a few screws into the flooring.
Next, the walls. These I managed to cut fairly tight and
was able to jam in between the ceiling and the floor so I
didn't need to use any screws in this layer. The tricky
part here is making the cuts for the V-Front and around
the airconditioning unit. Once done fix up the gaps with
sealant and gap filler and leave for a few hours or over
night as you'll probably have to do some trimming of the
gap filler. It's really important with each layer to try
and get it as airtight as possible so don't be shy filling
those gaps.
Then you're on to the next layer which I did in the same
order as the first layer. Remember to overlap the foam
panels so the gaps do not line up. Things should go much
the same as your first layer. Hopefully you've kept track
of where your studs are. For this layer I used 5" self
tapping screws and again had to predrill into the studs. I
used some glue on this layer but I didn't find it that
useful as it took too long to set.
After you're all done again fill the gaps with sealant and
gap filler and leave for a few hours or over night.
Next step is the doors. When I closed the doors I noticed
a 1" gap between the door and the floor insulation. When
making my first layer for the door I cut a 1" x 4" high
gap for the bottom of the doors. When I closed the door I
found it took a little effort for the door to close.
Perfect. The second layer for the doors can just be added
over the existing door from the floor to the ceiling.
To allow the door to close some of the center area of the
door where the doors meet must be cut away. Be careful not
to cut too much so that you allow for enough meeting of
the insulation on each door to give some insulation when
the doors are fully closed. |


|
|
|
Step 5: Adding the layer of plywood and water sealant
You'll need to buy some extra plywood as you'll be
covering the ceiling, floor and doors where you previously
haven't removed any plywood.
I started with the floor using a decent thickness of wood.
This was easily laid down and secured using the 5"screws.
Then it was on to the walls using the old materials I'd
salvaged. Of course the measurements are all different now
so there was some cutting but all in all the sides went
back together well. I used the 5" screws and tried to find
the studs as best I could. By now I was missing quite
regularly but found enough to keep the whole thing secure.
I used the insulation glue also to help keep the plywood
flatter against the inuslation foam. I then went around
and filled the old holes with wood dough and pumped some
more sealant into any new holes I'd created when I missed
the studs.
For the ceiling I used a 1/8" ply (same as the sides) and
again used 5" screws and attempted to hit the studs.
Definitely a 2 or 3 person job. I was also quite liberal
with the glue here in case I really had a hard time
finding the studs.
Lastly was the doors. These were the easiest part and I
nice end to the construction part of the project.
Again I went around with gap filler and filled all the
gaps. This time it's more for moisture than for
insulation.
After you're happy with that and its dried it's time to
seal the plywood against moisture. I searched around for a
long time about sealants you can and can't use next to
food. After finding it hard to get a straight answer from
my local stores I ended up on a woodworking sight where
the question was answered. Basically after they have cured
shellacs, lacquers, varnishes etc are safe around food.
After all people coat bowls and chopping boards etc with
these sealants so the inside of the trailer (which is
never going to come in direct contact with food) should be
fine. If you wanted to be really safe you could go with a
type of oil. These however tend to need regular
reapplication which may not be possible if used all the
time.
I applied 3 layers over 2 days. Depending on the product
you use it may take 1-2 weeks for the product to cure
properly.
That's it! |


|
|
|
September
update
Our first summer into using the cooler and the cooler has
been working great. For June we had the cooler on only a
few days a week when we had produce in there. We left the
doors open when it was not in use which was great
for drying it out.
For July and August the cooler has been running
continuously. The cooler seems to easily get down and keep
down to 40 F. I ended up just parking the trailer in the
shade of a tree to help with the electric bill. It stays
fairly damp inside the trailer but I have not noticed any
degredation in the plywood or insulation. When we're all
done this year I'll let it dry out and then apply more
coats of varnish to the plywood.
We feel the trailer is worth its weight in gold:
- Our produce is always kept cold so we can store it
for longer and still sell it.
- We can take more to market and not worry if we don't
sell it. Then if we have a really busy market we can
take advantage of having more there.
- As our produce is stored better (at home and at
market) the customer gets a better, fresher product
which helps distinguish us from other vendors.
Customers have definitely noticed how long our produce
lasts in their fridge.
- Consequently, we have thrown away very little
harvested produce this year.
- It seems to be very economical to run, between $1-$2
per day.
- (It's also great for parties - storing food and
beer)
Also, we have not needed to buy a generator for market
use. In the end we were able to hook up to an outlet at
all our markets.
Problems
We have only had two issues.
- The sensor fell out of the A/C unit while driving
and the unit froze up when we plugged it in again.
After allowing to thaw out everything worked fine. Now
I always check that the sensor is in place before
restarting the unit.
- The A/C unit stopped working entirely at one point.
The fuse on the plug would trip instantly. After much
consternation we worked out it was moisture in the
actual plug. The A/C unit is obviously not designed to
be in such a humid environment on the inside. I took
the unit out of the trailer and put a fan on it. Once
it had dried out and the unit was working again I
taped all seams and points moisture could enter the
plug with electrical tape and I have had no further
problems.
|
|
|
|
4
years on
Now in its 4th year of use and the trailer is still going
strong. For two years we used it solely as our on farm
cooler and market trailer so between June and October it
was almost in constant use. Last year we added another
coolbot refrigerator unit to the farm and are now able to
give the coolers a break occasionally.
Other than the issues mentioned above there have been no
other problems. I still use the same coolbot and air
conditioning unit that I originally bought.
Next time I make another refrigerated trailer I would
choose a trailer with a flat front end (The angled front
end does not provide any more area really and made cuts
difficult), wouldn't put paneling on the ceiling and would
choose a durable paint rather than coating with a poly.
Good Luck!
|
|
|
|
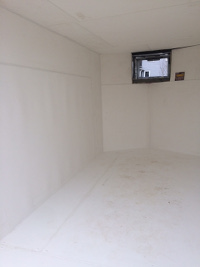
7
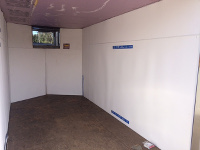
years on - Interior Fix
Well, my CoolBot Refridgerator Trailer is
in it's 7th year and the only regret I have is using
Plywood to line the inside so I've torn all that out and
replaced it with a waterproof washable plastic wall.
On pulling off the plywood there was a lot of rot and
grime behind the walls and also once the water got under
the polyurethane it tended to stay wet and rot even worse.
I would not recommend using plywood as the liner to the
trailer due to too much moisture.
The foam insulation is in perfect shape however and
I am still using my original air conditioner and coolbot
unit. I have no issues with keeping the trailer cool in
summer still.
This interior upgrade cost me around $300 for materials
consisting of:
9 x PolyWall Panels @$20 each
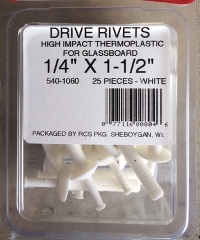
6 x Packets of Drive Rivets
12 x PL 550 (This product didn't work too well so look for
another adhesive)
18 x 8' lengths of joins and edges to cover seams etc
You'll also need a utility knife and straight edge to cut
the PolyWall, a drill with 1/4" bit and a hammer,
measuring tape etc.
And that's it! There's also a more rigid PolyWall product
with fibre glass in it.
I managed to put the new walls and ceiling on by myself
with the only tricky part being the ceiling which I did by
cutting the sheets into 4' lengths due to the PolyWall
wanting to fall on my head. Otherwise the PL550 acted fast
to stick the PolyWall to the foam insulation and I put a
few rivets in to make sure the piece held. I left the
walls to dry overnight then came back and did some
caulking etc. This is probably a 2 day job, less with
help.
I just finished this a day or so ago (04/03/2017) so I
will post if any problems arose otherwise assume all was
ok.
Good Luck!
|
|
|